How to create an online menu for restaurants
This guide walks you through creating your restaurant's online menu with Menubly — from signing up to sharing the menu with your customers. By the end, you'll have a live menu URL and QR code ready to use.
Two ways to get started
You have two options to create your online menu:
Create it yourself — Follow the step-by-step guide below to build your menu from scratch. It takes just a few minutes.
Upload your existing menu — Have a paper menu or PDF? Send it to us and we'll convert it into an online menu within 24 hours, for free. WhatsApp us or Email us at support@menubly.com to get started.
Step 1: Sign up and create your menu
Go to the Sign up page
Enter your Name, Email Address, and Password
Enter your Business Name
Check that your Menu URL looks good — this is the public link you'll share with customers (e.g.,
https://app.menubly.com/p/your-restaurant-name)Click Create to finish signing up
Sample categories and items will be added to your menu automatically. You can change or delete these in the next steps.
Step 2: Add categories
Categories organize your menu into groups like Appetizers, Mains, Drinks, or Desserts.
Click Add Category to create a new category
Click on the category name to rename it
Repeat to add as many categories as you need
To delete a category, click the three-dots icon (⋯) next to the category and select Delete.
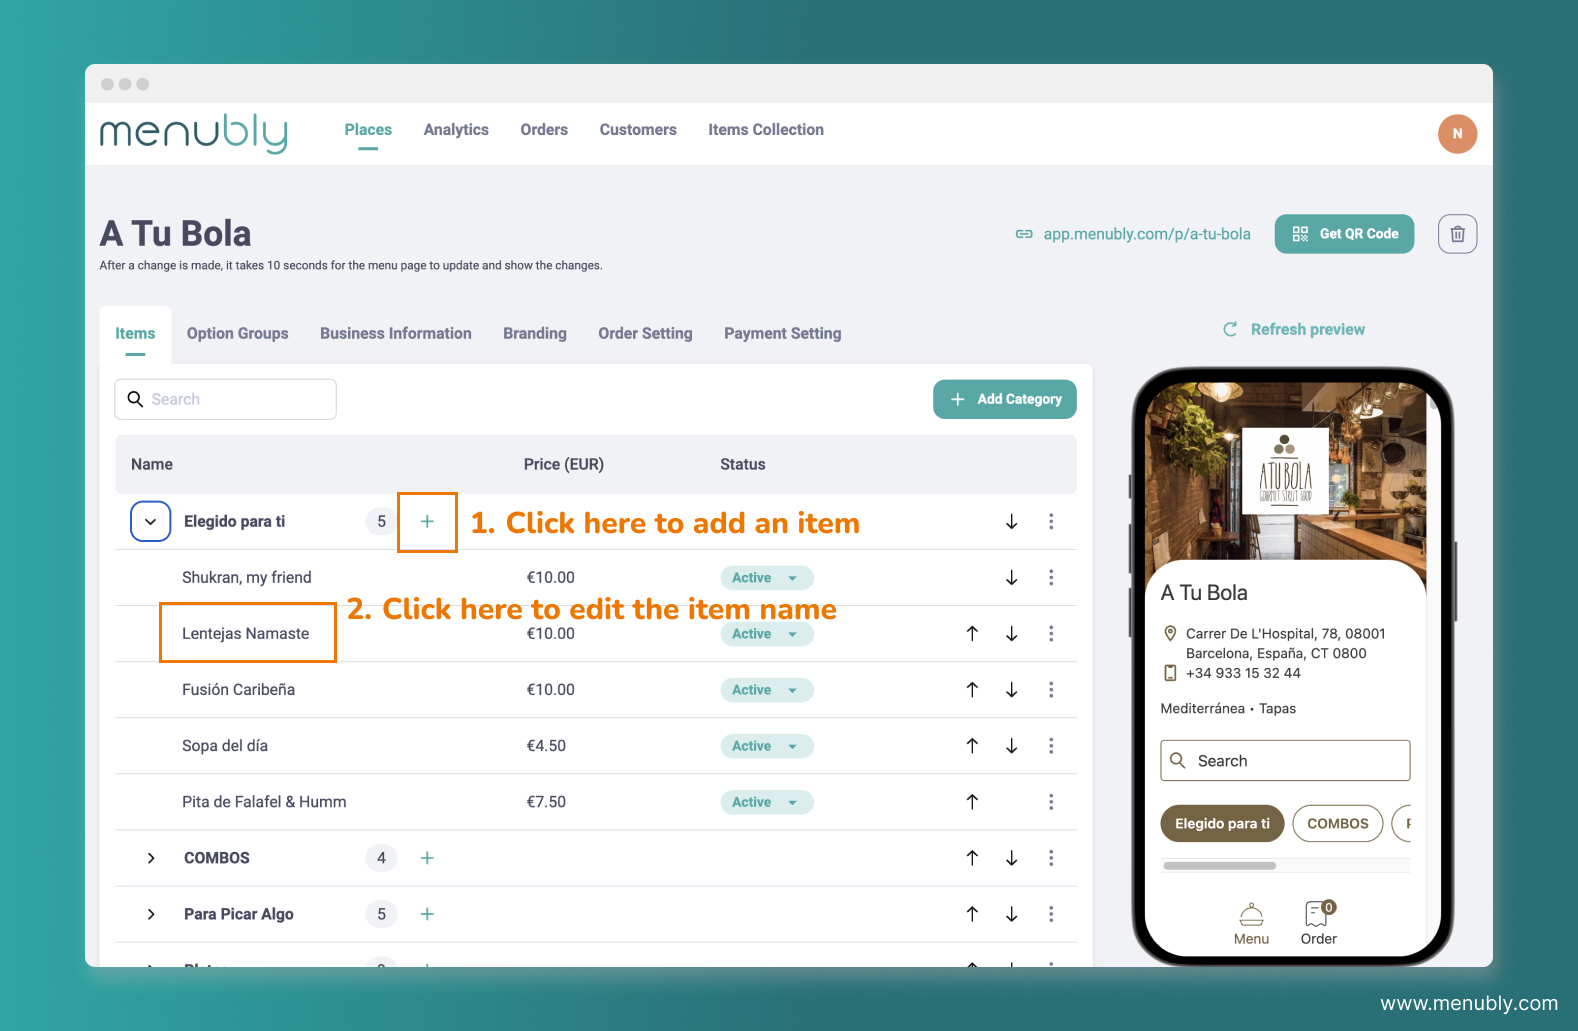
Step 3: Add items to your categories
Items are the individual dishes or products within each category — like Burger, Spaghetti, or Iced Latte.
Click the Plus icon (+) next to the category name to add a new item
Click on the item name to rename it
Repeat to add as many items as you need
Step 4: Edit item details
Click on any item to open the item details screen. Here you can edit:
Item name: The name displayed on your menu
Item category: Which category this item belongs to
Item price: The price shown to customers. To change the currency, go to the Business Information tab
Item description: Additional details about the item (e.g., ingredients, allergens)
Status: Controls how the item appears on your menu, includes
Active: The item appears on your menu and customers can order it
Sold out: The item shows on your menu but is marked as "Sold out" — customers can see it but can't order it
Hidden: The item is completely hidden from your menu. Useful for seasonal items you want to bring back later
Image: A photo of the item displayed on your menu
After editing, click Save and Close.

Step 5: Add option groups (optional)
Option groups let your customers personalize their orders — choosing sizes, toppings, sides, or any other customization you offer. For example:
Size — Small, Medium, Large
Toppings — Extra cheese, Mushrooms, Pepperoni
Side dish — Fries, Mashed potato, Salad
To set up option groups:
Go to the Option Groups tab
Click + Group to create a new option group
Set the rules (optional or mandatory for customers)
Click + Option to add the available choices
Click Apply to items to link the group to your menu items
For the full walkthrough, see How to add add-ons and options groups to menu items.


Step 6: Edit your business information
Go to the Business Information tab
Fill in your restaurant details:
Field | Description |
|---|---|
Place name | Your restaurant's name |
Phone number | Your restaurant's phone number |
Address | Displayed below your restaurant name on the menu |
Currency | The currency used for item prices (e.g., USD, EUR) |
Header Note | A short message displayed above the menu (e.g., "We offer free delivery!") |
Foot note | A note at the bottom of the page (e.g., "All prices are VAT inclusive") |
Click "Save"

Step 7: Customize the look and feel
Go to the Branding tab
Customize your menu's appearance:
Field | Description |
|---|---|
Theme color | The accent color used throughout your menu |
Background color | The background color of your menu page |
Text color | The color of your menu text |
Header image | A large cover photo displayed at the top of your menu |
Logo image | Your restaurant's logo |
Click Save
For the full walkthrough, see How to customize your menu design

Step 8: Share your menu
Your menu is now live! You can find your public URL and QR code in the top right corner of your dashboard.
Share your menu URL:
Click the public URL at the top right to preview how your menu looks to customers
Copy the link and share it on social media, your website, or send it directly to customers
Use the QR code:
Click Get QR Code next to the URL
Download and print the QR code
Place it in your restaurant so customers can scan it with their phone
For more details on printing and placing your QR code, see Create and print the QR code for your restaurant's online menu.

Tips
Add photos to your items — menus with images get significantly more engagement and orders
Keep item descriptions short — highlight key ingredients or allergens, not the full recipe
Use the Header Note to share important info like delivery hours or promotions
Check your menu on mobile — most customers will view it on their phone, so preview it on a mobile device
Update item statuses instead of deleting seasonal items — set them to Hidden and bring them back later
Frequently Asked Questions
Can I have multiple menus?
Yes. Each additional menu costs $9.99, and we offer discounts for bulk orders. Email us or WhatsApp us to add more menus to your account — useful if your restaurant has multiple branches or separate menus for dine-in, delivery, or different locations.
Can I change my menu URL after creating it?
No. Your menu URL is set when you create your account and cannot be changed. Make sure it looks good before you sign up.
How do I change the currency on my menu?
Go to the Business Information tab and change the Currency field. This applies to all items on the menu.
Can I reorder categories and items?
Yes. Drag and drop categories and items to rearrange them in the order you want.
Is there a limit to how many items I can add?
No. You can add as many categories and items as you need.
Can my customers place orders through the menu?
By default, your menu is view-only. To accept online orders, you'll need to set up online ordering.
Can I upload my existing paper menu instead of building one manually?
Yes. Send us your paper menu or PDF via support@menubly.com or WhatsApp, and we'll convert it into an online menu within 24 hours, for free.
How do I mark an item as sold out?
Click on the item, change the Status to Sold out, and click Save and Close. The item will still show on your menu but customers won't be able to order it. See How to mark items as sold out for more details.